


It is always exciting to get a new Mac. Not only do you have the sleekest, latest model of computer, but your old one was probably starting to slow down and become unusable. We are here to help you make sure that it is as easy as possible for you transfer all of your data from your old device onto the new one! In this blog post, we will discuss how to export content on an older Mac using Time Machine, then import that same content into a newer version of macOS or Windows 10 with iTunes on another machine without losing any data.
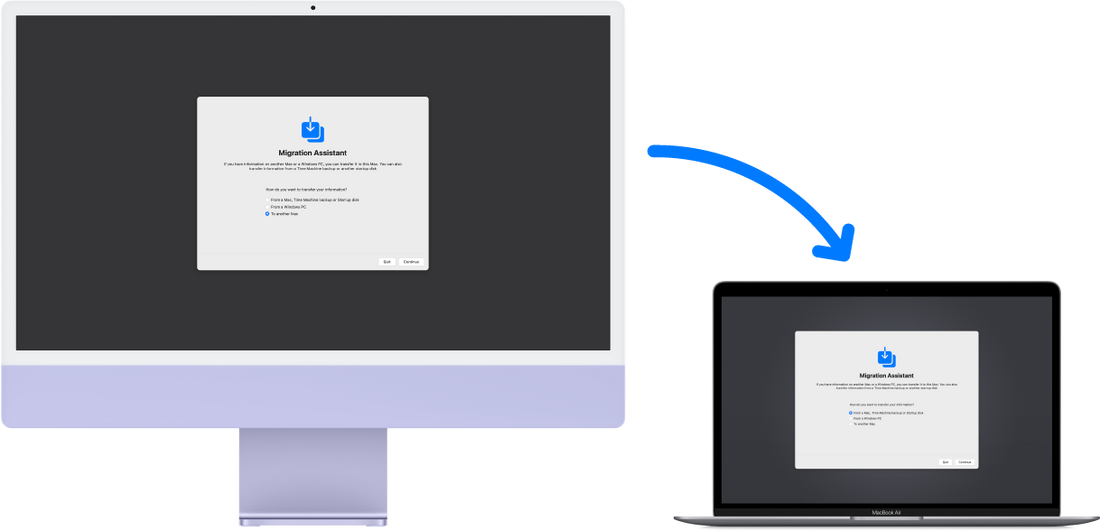
The process of moving your files from one computer to another is simple with Migration Assistant. You can use this app for both PC and Mac users, saving you time in the long run! Migration assistant will copy all of your documents as well as apps so that they are available on any device; after it's done copying over settings too - voila: perfect synchronization between devices everywhere.

We're so excited for you that our Migration Assistant tool has been a huge help in migrating to an all-new Mac. Did we mention it copies your files automatically?
Migration assistant does the hard work of moving everything over and saves time, stress, plus potential human error!
- If your files are currently on a PC, follow the PC migration steps instead.
- If you're moving content from a Time Machine backup, follow the steps to restore your Mac from a backup instead.
Get ready
Updating your computer is an important part of keeping it safe and secure. So, before you upgrade or install any new software on the system make sure that all available updates have been applied first!
To ensure that your computers are on the same network, and each have access to the internet without any issues. Turn both devices' Wi-Fi settings to "On" before proceeding with this tutorial if one device is using macOS Sierra or later then placing them near each other will work fine; however it's recommended for two different OS X El Capitan users (or earlier versions) who want their machines close by so as not miss out on anything through lack of connection timeframes between themselves due getting too far away from home while traveling etcetera).
To share your old Mac with other devices, choose Apple menu > System Preferences and select Sharing. Make sure that a name appears in the Computer Name field for this sharing session before clicking ok or pressing enter on one of its buttons (this will create it).

Use Migration Assistant
You're now ready to use Migration Assistant to move your files from the old Mac to the new one.
On your new Mac
- Open Migration Assistant, which you can find in the Utilities folder of your Applications. Then click Continue to move forward with this process and prepare for an upcoming transfer!
- When you give permission for the changes, enter your password and click OK.
- When transferring your information, make sure to choose the option that best suits you. This could be either from a Mac or time machine backup disk as well as startup drive!

On your old Mac
- Open the Migration Assistant and click continue.
- When you're asked how to transfer your information, select the option for another Mac and click continue.
On your new Mac
When asked to select a Mac, immediately click the other computer. Then continue with your request without interruption from this point on!

On your old Mac
If you see a security code, make sure it's the same for both iTunes and your new Mac. Then click "Continue"
On your new Mac
When you're transferring your accounts, be sure to select what information will transfer with them. In this example John Appleseed is the macOS user account he's been using for years now so if there are any problems or confusion about replacing it on another device just knows that one thing isn't changing - his home folder address!

You'll be able to continue the transfer in a few minutes. Transfer sizes over 10GB require more time but shouldn't take longer than an hour or two!
When you're done with all of your files, quit Migration Assistant on both computers then log in to the migrated account on your new Mac.
Follow us for more information and updates, wristwatchstraps.